Creativity Beyond the Beads: Handmade Book

Book

The other day I was looking for a new book to write down my creative ideas, and I came across this one that I had made 10 years ago. A printer, old photos, paper & a hole punch…decoupage et voila: πŸ™‚

After all these years, several moves & even a location to another part of the country – and I had never used this book. Until now. I made this book in a very sad time in my life…I think it was waiting for a more positive time to inspire. πŸ™‚

Jewelry Inspired: Getting Started with Gemstones

Turquoise

Back when I started jewelry making, the thought of using actual gemstone beads in my designs seemed unattainable. I was unemployed, and I had to decide between jewelry making supplies or food much of the time.

Then one day while browsing ebay I stumbled upon chip beads. Long, 18 to 21 inch strands of stone chips with a hole drilled in each – and if you think of how many beads you get per strand, that makes them more affordable than machine cut glass beads.

I must admit in the beginning I had a hard time using these irregular shaped gems in designs. But soon I grew to appreciate the raw feel of the stone. It also was a good practice in judging detail. For example, if I were to make a pair of earrings with chip beads it is important to try & find beads that are similar in shape & size so that both the earrings in the pair appear balanced.

I still have quite a few chip beads from “back in the day”- and will even pick up a strand or two here and there at a Gem Show if they catch my eye. My only word of caution is, they can be soft & fragile due to their irregular shape thickness, so if wrapped too tightly they can break.

Here’s some examples of jewelry I have made with gemstone chips:

Malachite

Mookaite

Howlite (dyed)

Turritella agate

Red tiger eye

Lapis lazuli

emeralds

turquoise

amethyst

garnet

My New Investment: A new DSLR Camera

Dslr

I’ve been quiet as ofΒ  late, & that is because last week I finally decided it was time to upgrade my camera & invest in something less automatic. I have been using a digital point-and-shoot camera for 4 years now,Β  & it has served me well. However I felt very limited. I wanted to be able to customize more, and also achieve true macro photos, rather than ” macro”Β  (close ups) with a telephoto lens. I wanted to get more detail in my photos; that 3-D effect you see with a true macro lens.I also found photo taking time consuming, as I would have to take several shots, then download them onto my computer, sift through the different angles and choose the best. Time is money. Being able to take a decent picture the first time, crop & go would be heavenly! Especially with the amount of jewelry I have been making lately.

So I assessed my needs. I knew for my budget and experience I wanted something relatively entry level as far as ” pro”Β  style cameras were concerned. For me that meant being able to add a macro lens. I needed speed & ease of use. I needed something I could learn quickly & start taking decent photos right away without much of a learning curve, but still be able to customize.

So I narrowed it down to the two main players. Will it be Nikon or Canon? In the end I decided on a Canon camera specifically because it comes with computer software (Nikon has software too but you have to purchase it separately). Computer software means – you can control your camera & shoot your photos directly to your computer – which is a huge time saver!

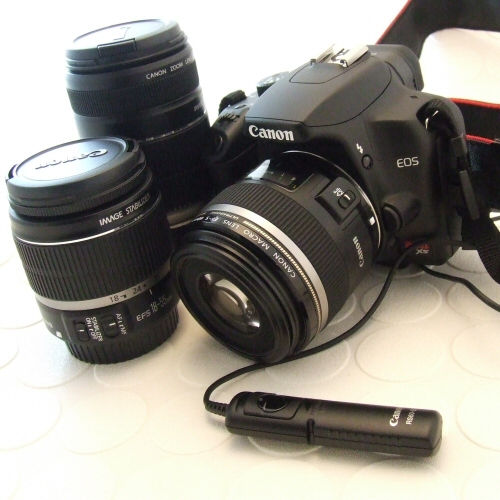
The other reason I was sold on a Canon is because Costco sold them. With Costco I can return the camera with no questions asked, so if it didn’t meet my needs it would be easy change. Also Costco products come with a 2 year warranty with my membership. For my budget, Costco had the Canon EOS Rebel XS and XSi series. The difference was about $200 on the price. In the end I went with the Rebel XS as I wanted to have cash for accessories like a macro lens & a remote switch. I figured a sacrifice of megapixels for a great lens was worth t.

Costco sold both cameras with an add-on package which included a bonus lens (comes with both EF-S 18-55IS and EF-S 55-250IS…I guess “IS ” is a relatively new technology for them that stabilizes the lens to compensate for camera shake) & camera bag. The macro lens and switch I bought from a local camera store. The switch is great because you don’t have to worry about moving/shaking the camera when you press the shutter, but honestly I’m not using it as much as I thought I would since I am controlling the camera from my computer. Still a handy accessory to have.

As far as the macro lens goes, it was a painful decision for me. I knew I wanted the 100mm macro lens, but it was a hard pill to swallow cost wise – more than the price of the camera. So I decided on the 60mm lens: EF-S 60mm f/2,8 Macro USM. It was roughly the same cost as the camera, which was easier for me to live with. I have to be closer to my subject to take the photo but it still photographs wonderfully and the motor is whisper quiet.

This is my old camera…good ol’Β  point-and-shoot Fuji Finepix. Bought for approx. $300 CAD 4 years ago. Served me well and we will still use it as a back up camera.

But how does it do for taking pictures, you ask? Is it really worth the investment? Keep in mind, I am still learning. But I am impressed by the results despite my limited knowledge of camera settings.

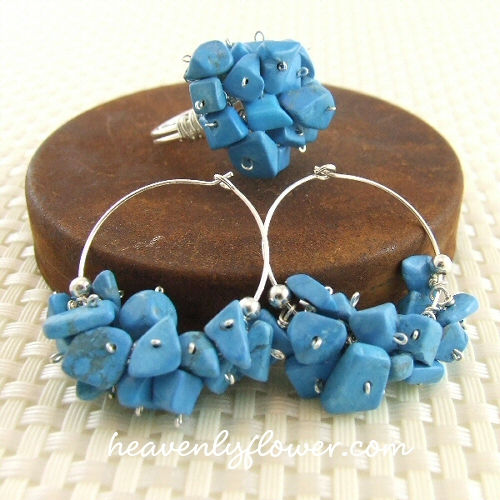
The one on the left is taken with my Fuji camera. That is about as close as I could get to the piece, and about as white as I could get the background without ” photoshopping” .Β  The one on the right is with the new Canon Rebel camera, absolutely no cleaning or tweaking of the image. Taken by someone who didn’t know what the heck they were doing. The macro lens was pretty much fresh out of the box here. I immediately fell in love. πŸ˜‰ I’d say not bad for straight off the camera. I know many would argue it is washed out – that is a camera setting thing – I personally like the artistic merit of the image in this form.

Here’s my set up. My old laptop is controlling the camera. πŸ™‚

I think my only disappointment is that there are some tools in the software unavailable for the XS and XSi series that the higher end cameras have the ability to do (like setting custom white balance).Β  I guess that means upgrade in the next few years. πŸ˜‰

Read about my other new gadget that I love:Β  The Nook on my other inspired blog. πŸ™‚

Come Tour My Jewelry Box: Pearls from the Philippines

Pearls

I attended a very dear friend’s wedding today, so I thought blogging about my pearls tonight would be fitting.

During my own wedding a few years ago, my mother’s dear friend whom she had known back in the Philippines traveled all the way from Switzerland to attend. That was an honour in itself, and then she gave me the gift of a string of pearls. What made them particularly special to me, is that they were hand picked from the Philippines. She gave me her blessing to go ahead and restring them.

So I decided to pair them up with some sparkly Swarovski crystal rondelles and add a sterling silver extender chain so that I would have the freedom to wear them at different lengths.

If I have never mentioned it before I will mention it now: I. Hate. Stringing. Pearls. I’ll do it, but I do not enjoy it. I admire anyone who can do it well and quickly: that just ain’t me. πŸ˜‰

I put two pearls aside to make matching earrings; coupled with silver-gray freshwater pearls for contrast.

Oddly enough, I didn’t wear this set today. πŸ™‚

I cherish having a classic set of pearls which hold such meaning for me.

Check out my fossil/slab necklaces also from my jewelry box. πŸ™‚

Creativity Beyond the Beads: Wedding Invitations

Invitations

Before there was the beads, the wire, the metal – there was paper. I have been in love with paper crafts since I was a little girl. I used to sneak paper out of my dad’s desk and cut it up for later gluing into little books or drawing pictures on – as early as the age of 5.

I had the privilege of designing & making the invitations forΒ  a dear friend’s wedding. The color scheme was lilac (lavender) with a gold accent. After consulting back & forth with my friend I chose card stock for scrapbooking in the two colours. In the beginning we were just going to do lilac & white but after she mentioned it I agreed that the gold accent would be nice.

I cut the lavender paper into strips using a paper cutter, and then cut small lengths of the gold paper to add as an edging.

Ribbon was added to the center of the strip.

This piece was then glued to the middle front of the card.

Inside the card, I had already placed lilac colored paper inside with a vellum overlay. On the vellum was printed the text for the card. The vellum was adhered with a vellum tape so that you did not see a mark where the tape was through the opaque paper.

My friend wanted a monogram design for the card. I designed one on my computer using Paint Shop Pro, and printed them out. Originally I designed this as a square monogram, but the couple preferred oval. At first I wasn’t sure how to achieve the oval shape neatly. Cutting free-hand was not clean or even at all. But before I gave up on the idea altogether the curvy cutter came to my rescue!

Using the graduated oval template for the curvy cutter, I made ovals with the lavender paper slightly bigger than the monogram to adhere as a backing.

I felt that there was an imbalance with the gold only down the sides of the middle strip, so I cut another slightly larger circle out of gold foil paper to make it all come together. I just wanted a bit of gold peeking out the sides.

The assembling…in progress. πŸ™‚